Thursday, October 29, 2015

Basics & Working of GUI Environment in Programming: Introduction to JAVA

GUI, Graphical User Interface, refers to the windows, buttons, dialog, menus and everything visual in a modern applications of JAVA. A GUI application involves much more than a screen made up of GUI components. It also involves properties of its components, actions events etc. in this article, we shall learn about these basics of a GUI.

Working of a GUI

A GUI Application consists of many GUI components such as windows, dialog, menus and other controls etc. while using a GUI Application. When you perform an action, an event is generated. In event-driven programming, that most GUI follow, the program respond to the events. Let us learn about how most GUI's function. And as you can guess that this depends upon how the constituent windows, events etc. function.

Working of windows, Events and Messages

A window can be bought off as simple as rectangular region with its own boundaries. You are already aware of several different types of windows: a document window or a dialog box etc. While these are the most common examples, there are actually many other types of windows. A common button is also a window. Icons, text boxes, option buttons and menu bars are all windows.

The windows operating system manages all of these many windows by assigning each one a unique id number (called window handle). The system continually monitors each of these windows for signs of activity or in other words events. Events can occur through user actions such as a mouse click or press, through programmatic control, or even result of another window’s action.

An event refers to occurrence of an activity.
  • Each time an event occurs, it causes a message to be sent to the operating system.
  • The system processes the message and broadcast it to other windows.
  • Each window can then take the appropriate action based on its own instructions for dealing with that particular message (for example, repenting itself when it has become covered by another window).

A message is the information/request sent to the application.

As you might imagine dealing with all of the possible combinations of windows, event and message could be complex. Fortunately, Java insulate you from having to deal with all of the low-level message handling. Many of the message are handled automatically by Java; others are exposed as Listener method for your convenience. This allows you to quickly create powerful applications without having to deal with unnecessary details.

Saturday, October 24, 2015

NetBeans IDE Components Overview: Java Programming

NetBeans IDE provides different views of your code as well as other windows. When programming in java, programmer feels amazing working experience with windows like palette, properties or output window.

Earlier article was about NetBeans Features, in this article I will discuss about NetBeans IDE with their mostly used components. Start NetBeans IDE and create a desktop application from File-->New Project--> Java Desktop Application. It will show a window like below image:

NetBeans IDE Components Overview: Java Programming

The image shown some important components like properties window, palette with tools, inspector window, output window and etc. This article have a brief description about these components.

Title Bar

The tittle bar displays the tittle of the application. By default, NetBeans will give names as DesktopApplication1, DesktopApplication2 etc. to your project. Notice in following figure, it has given title DesktopApplication1 to your application.

Menu Bar and Pull-down Menu

You are familiar with menu bars as you have worked with MS-Windows operating system. A menu bar is displayed directly below the title bar and includes a lot of options. Each option on the menu bar has a drop down list of item (known as Pull-down menus) that helps you to perform various tasks.

Toolbar

A tool bar is a bar that displays icons for commonly used tasks. The standard toolbar of NetBeans IDE displays icons for the most frequency used commands in NetBeans.

GUI Builder

Also called Design Area or Design Space. The design Area is where you will visually construct your GUI. It is the primary workspace within which GUI design takes place in the IDE. The GUI Builder enables you to layout forms by placing components where you want them and by providing visual feedback in the form of guidelines.

It has two views: Source View and Design View. Design view is the default, as shown above. The Source View opens the code editor for programmer to be add/edit the code for application. You can toggle between views at any time by clicking their respective tabs.

The Palette

The palette contains all of the components needed to create a GUI Application. Palette consist of window controls and frames.

Frames
A frame is a window that typically has decorations such as a border, title, and buttons for closing and iconifying itself. A GUI application typically uses at least one frame. Frames are used to display things like labels, text fields, buttons and other controls.

Controls
Controls are component objects such as text fields, labels, and list boxes etc. that are drawn on frame to get data input or to display output.

Inspector Window

This window displays a hierarchy of all components contained in the currently opened from. Displayed items include visual components and containers, such as buttons, labels, menus and panels, as well as non-visual components such as timers and data source.

Properties window

This window displays the editable settings for the currently selected component. The figure shows the Property Editor for JFrame object.

Code Editor Window

The code editor window is where you write Java code for your application. By code we mean language statements, constants and declarations. The Code Editor window serves as an editor for entering application code. A separate code editor window is created for each top level frame that you create in your application. Using the Code Editor window, you can quickly view and edit any codes in your application.

To open the Code window Double-click the control for which you choose to write code. Or from the GUI Builder window, click at Source tab. You may also press Ctrl + Alt + Page Up/ Page Down.

NetBeans Features in Application Development: Introduction to JAVA

When programming in java, software developer have many in-built features provided by this NetBeans Ide. This Ide provides first-class comprehensive support for the newest java technologies and providing support for JDK 8 previews, JDK 7 including its related HTML5 enhancements.

NetBeans IDE is a free, open-source, cross-platform IDE (Integrated Development environment) with built-in support for Java Programming Language. In fact, NetBeans runs anywhere there’s a JVM (Java Virtual Machine). This ide is a RAD tool, used to develop java softwares. 

Here're some features for application development NetBeans provide:

  • Drag and drop GUI creation
  • Excellent editing (advance source code editor)
  • Web-services
  • Excellent debugging
  • Wizards, code generation and management tools and many more 

Before you start developing application, make sure that Java SDK along with NetBeans IDE is installed on your machines. You can download latest version of NetBeans IDE along with Java SDK (Software Development Kit) from the NetBeans page in java sun pages.

After downloading, install the software by using some simple steps. The downloaded installer will install both Java SDK and NetBeans either through Start →All Programs→NetBeans→NetBeans IDE or by clicking at its shortcut on the desktop. After installation launch the NetBeans IDE, it will show a splash screen containing some information about netbeans, version and etc. shown in the image.


NetBeans Features in Application Development: Introduction to JAVA, splash screen

Splash screen is shown when the ide loads basic information to run. As in the image, the red color progress bar is going on with a message Done loading modules. The NetBeans IDE has many features. But you need not learn every feature of it. To get yourself started, you need to know about the features listed below. Other features, you can leans according to the need.


NetBeans Features in Application Development: Introduction to JAVA, IDE

There are various components of this IDE, which will be discuss in later article.

Rapid Application Development Tools used in JAVA Programming: Introduction to JAVA

To write programs in java, programmer have to know about RAD tools, which is essential topic in the java programming. RAD tools are also helpful in development of large application with a little bit support of JVM.

Rapid development of an application is possible through Rapid Application Development (RAD) tools. The RAD tools are the tools that enable one to create applications in shorter time as compared to conventional language. A range of application can be created with RAD tools. Through RAD tools, you can not only develop a small utility program, but also a large enterprise system or large distributed applications.

In fact, NetBeans IDE offers a RAD style of developing applications for Windows programmers. With NetBeans IDE, you can develop applications just by creating frames, dragging and dropping controls on to frames, setting properties for various things, adding some application-specific code to handle events and that is it? But this simple graphical, form-based approach can create wonderful applications.

Rapid Application Development (RAD) describes a method of developing software through the use of pre-programmed tools or wizards. The pre-programed tools or controls are simply dropped on a screen to visually design the interface of application.    

While developing large application, the RAD tools are used to create prototypes of a large application. A prototype is the first model that is made of something. The prototype is used as a basis for later improved model. These prototype provide the look and feel of application being developed.

There are many more RAD tools in existence that may be of desktop tools, database rad tools, cloud-based tools, cross-platform and etc. Here’re some desktop RAD tools:

  • Accelerator for .NET: Provides end-to-end RAD generation and other productivity frameworks for .NET, including support for MVVM and WCF.
  • Dolphin Smalltalk: is a small talk development environment for windows with advanced RAD features.
  • Microsoft Visual Basic: developed by Microsoft, provide advanced features to developer.
  • Softwell Maker: is a desktop IDE with cross-platform deployment component allowing publish application into almost JAVA enable system.

All other RAD tools are listed on Wikipedia and can be readable from different types of RAD Tools.

How to work with Prefix version of increment/decrement operators in JAVA

When increment or decrement operators works in prefix manner then they follow the change-then-use rule. Java performs these type of operations before using the value of the operand.

When an increment operator precedes its operand (i.e. in its prefix), Java performs the increment or decrement operation before using the value of the operand. For example, the expression

sum = sum + (++count);
will take place in the following fashion. (Assuming the initial values of sum and count are 0 and 10 respectively). The expression will execute in the following sequence:
0=0+10;
-=0+11;
11=0+11

So from this sequence the sum will have its value in the third execution.

The expression
                      P = P * --N;
Will take place in the following fashion. (Assuming the initial values of P and N are 4 and 8 respectively). The expression will execute in the following sequence:

-=4*8;
-=4*7;
28=4*7;
The prefix increment or decrement operators follow Change-then-use rule i.e. they first change (increment or decrement) the value of their operand, then use the new value in evaluating the expression.

How to work with Postfix version of increment/decrement operators in JAVA

When increment or decrement operators works in prefix manner then they follow the Use-then-change rule. Java, first use the value of operand and then change the operand’s value.

When an increment or decrement operator follow its operand (i.e, in its postfix form), Java first uses the value of the operand in evaluating the expression before increment or decrementing the operand’s value. For example, the expression
sum = sum + count++ ;
will take place in the following fashion. (Assuming the initial values of the sum and count are 0 and 10 respectively). The expression then execute in the following sequence:
-=0+10;
10=0+10;
10=0+11;

Check out another expression:
P = P * N--;
Will take place in the following fashion. (Assuming the initial values of P and N are 4 and 8 respectively). The expression then execute in the following sequence:
-=4*8;
32=4*8;
32=4+7;

The postfix or decrement operators follow Use-then-change rule i.e., they first use the value of their operand in evaluating the expression and then change (increment or decrement) the operand’s value.
Prefix version of Operator

Compilation used to Generate Byte Code in Programming: Introduction to JAVA

Compilation Process

The program or code in java written by the programmer is usually called the Source Code in programming. This source code needs to be converted in to language code, which a computer can easily understand. The process of converting a source code in to machine code, is called compilation. The converted machine code depends a lot on the platform it is executed upon. That means for different platforms different machine code is produced. This resultant machine code is called native executable code.

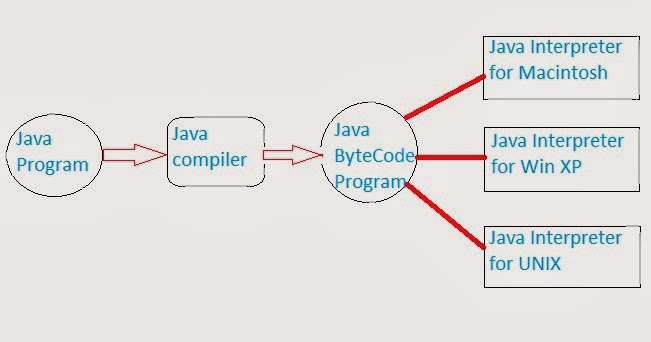
Compilation used to Generate Byte Code in Programming: Introduction to JAVA

Instead of using a compiler, which translates the program all at once, you can use an interpreter, which translate it instruction-by- instruction, as necessary. In order to execute a program, the interpreter repeatedly reads one instruction from the program, decide what is necessary to carry out that instruction, and then performs the appropriate machine language commands to do so.

Java Compilation

Contrary to ordinary compilers, the Java compiler does not produce native executable code for a particular machine. Instead it produce a special format called byte code.
Java Byte Code is a machine instruction for a Java processor chip called Java virtual machine. The Byte code is independent of the computer system it has run upon.
The Java Byte Code looks a lot like machine language, but unlike machine language Java byte code is exactly the same on every platform. This byte code means the same thing on a Solaris workstation as it does on a Macintosh Power Book or on a Windows Vista running on an Intel Pentium V.

Compilation used to Generate Byte Code in Programming: Introduction to JAVA

However, the Java programs that have been complained in to byte code still need an interpreter to execute then on any given platform. The interpreter reads the byte code and translates it into the native language of the host machine on the fly.

Since the byte code is completely platforms independent, only the interpreter and a few native libraries need to be ported to get Java to run on a new computer or operating system.

Java Virtual Machine with Java Platform